First published on 5 de Febrero de 2020 • Last updated on Mayo 29, 2024
This page may contain affiliate links; if you purchase through them,
we may receive a small commission at no extra cost to you.
El chucrut no es exactamente un alimento básico ecuatoriano. Ésa es una de las cosas buenas de vivir en el extranjero: me empuja a preparar los alimentos que me gustan pero que no puedo comprar fácilmente.
Hace un par de años, intenté hacer chucrut en casa y el resultado fue un desastre mohoso. En realidad me asustó un poco y decidí que fermentar alimentos no era para mí. Sin embargo, por aquel entonces podía comprar fácilmente chucrut fresco en el mercado local. Por desgracia, no hay grandes fabricantes de chucrut en Ecuador… hasta ahora.
El arte de la fermentación
Entra Sandor Ellix Katz y su libro El arte de la fermentación. Sandor me enseñó que el moho en la parte superior de una fermentación es en realidad muy normal. Lo que importa es lo que hay debajo de ese molde.
La primera vez que probé a fermentar la col, lo hice en una vasija de barro. No podía ver debajo del molde. Y todos sabemos que comer alimentos enmohecidos es una mala idea.
Esta vez elegí fermentar en un tarro de cristal transparente para poder ver el proceso. Y me hizo sentir mucho mejor. Tengo fotos para compartir contigo y puedo decirte que una col fermentada durante seis semanas tiene un sabor delicioso.
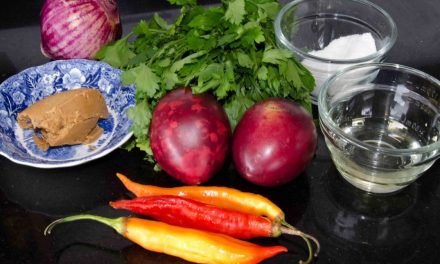
Ingredientes
- 1 col grande, rallada reservando enteras las hojas exteriores grandes
- especias a elegir; yo utilicé bayas de enebro
- sal, de la mejor calidad que puedas encontrar
Equipo
- 1 tarro grande
- pesas; utilicé piedras
- tela cubra el tarro; necesitas que el aire pueda salir de la vasija
Instrucciones para el chucrut
Pon la col rallada en un bol grande. Sálalo generosamente. No hay una cantidad correcta o incorrecta de sal. De hecho, según Sandor, puedes fermentar sin sal. Sin embargo, creo que nos perderíamos un sabor esencial del chucrut. Intenta alejarte de la sal de mesa común y utiliza sal marina de buena calidad. En recuerdo de California, utilicé un poco de nuestra sal marina especial de Monterrey.

La col empezará a resbalar a medida que vaya soltando agua. Eso es lo que quieres. Puedes masajear la col tanto como quieras para ayudarla a filtrar el agua. Cuanto más fino hayas cortado el repollo, más fácil será este proceso.
Envasa el Chucrut
Cuando haya empezado a supurar, empieza a envasarlo en tu tarro. Empaca y empaca y empaca. Apriétalo todo lo que puedas. Encima de toda la col rallada, coloca las hojas exteriores que habías guardado. Estos tipos serán tu barrera contra el moho. El moho crecerá sobre las hojas enteras y te facilitará la tarea de eliminar esa capa desagradable que habrías preferido que no creciera en primer lugar.


A continuación, añade tus pesas. Coloqué unas cuantas piedras de playa en bolsas de plástico y las utilicé. Puedes utilizar un plato pequeño que quepa si has utilizado una olla de boca ancha. O incluso puede ser útil una bolsa llena de agua. Cualquier cosa para mantener el peso de la col. A continuación, cúbrelo con una fina capa de estopilla u otro tejido que deje pasar el aire pero impida que entre nada más.
Llora Chucrut, Llora
Dale a tu col 24 horas para que llore todo lo que pueda. Si tienes suerte, el tarro estará lleno de agua a la mañana siguiente. Por encima de toda la col. Si no es así y el tarro sólo necesita una pequeña adición, utiliza agua filtrada para rellenar el kraut (yo tuve que añadir aproximadamente 1/2 taza). Debes asegurarte de que toda la col quede sumergida. No puedo imaginar que el tarro no esté lleno al menos 3/4 partes, pero si no es así, prepara una salmuera con agua filtrada y sal y rellénalo con eso.
 añadidas como peso. Observa cuánto se ha comprimido la col.")

Tiempo de espera
Ya puedes dejar reposar el chucrut.
Elegí un armario apartado donde la temperatura se mantuviera bastante constante y la col pudiera permanecer a oscuras, sobre todo porque opté por utilizar un tarro en lugar de una olla de barro.
Al principio, controlaba mi kraut cada pocos días. Hasta que nos fuimos. Por desgracia, me olvidé de ello. Cuando me acordé, el chucrut se había reducido a la mitad de su tamaño. El líquido se había evaporado, permitiendo que creciera una capa de moho.

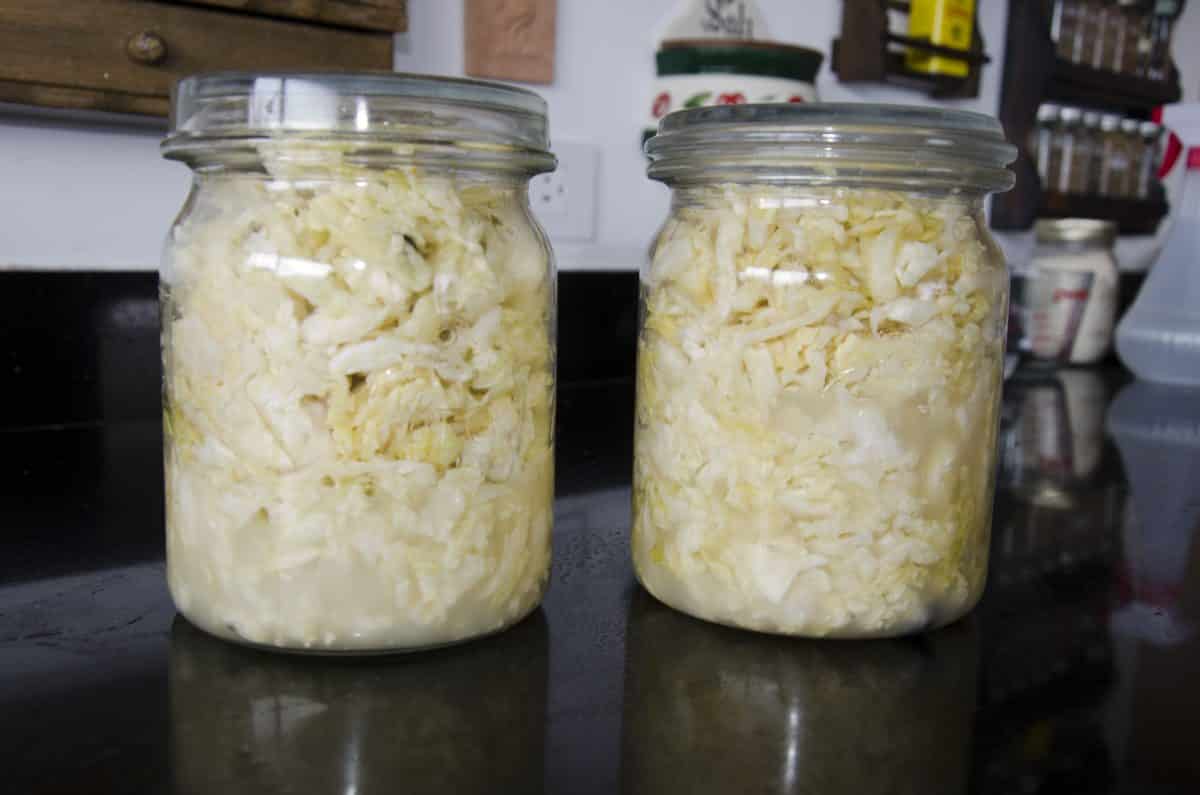
Delicioso chucrut bajo el moho
Estaba un poco preocupada, aunque podía ver el color adecuado del chucrut debajo de la capa borrosa. Cuando saqué las piedras y quité la desagradable capa de hojas enteras, encontré debajo el chucrut más precioso. Olía ligeramente agrio y salado, pero fresco como el océano. Y su sabor era perfecto, no demasiado agrio y con un crujido agradable. Nada pastoso.
Saqué el chucrut de calidad y lo coloqué junto con el líquido en dos tarros de cristal. Están en mi frigorífico, uno de ellos ya medio vacío. En cierto modo, es una pena que sea la única persona de mi casa a la que le gusta el chucrut. Pero, ¿quién soy yo para quejarme si me lo puedo comer todo?

Este post se publicó originalmente el 15 de marzo de 2014. Se ha reformateado y editado para mayor claridad.


